PES 2013 Blender Stadium Exporter Project 1.5 for Blender 2.67 Preview:
I’ve updated script codes and new 1.5 version is ready for Blender v2.67
Hi everyone, i’ve been working on the new stadium exporter project for PES 2011 stadiums since long while ago, this project based on the new Blender version (old version blender dont update anymore,new version is updateable and it has great some new features) this is similar tool like KONAMI’s one, i know they use MAYA and they made an exporter script with MEL (Maya Embedded script Language), i made that similar exporter tool with original features (multi-UV, optimized DDS textures etc..) for Blender, this is %100 original tool, thats mean if you have good skill/experience about Modeling, Texturing, UV Mapping and Lighting/Shading, your stadium will be same quality/filesize like original KONAMI’s stadiums with using this tool.There are over 3000 code lines in this script so im thinking release beta version for PES 2011 and test it with PES 2011, so fixing small bugs,some little improvements then make a stable version for PES 2012, read the below informations with carefully…
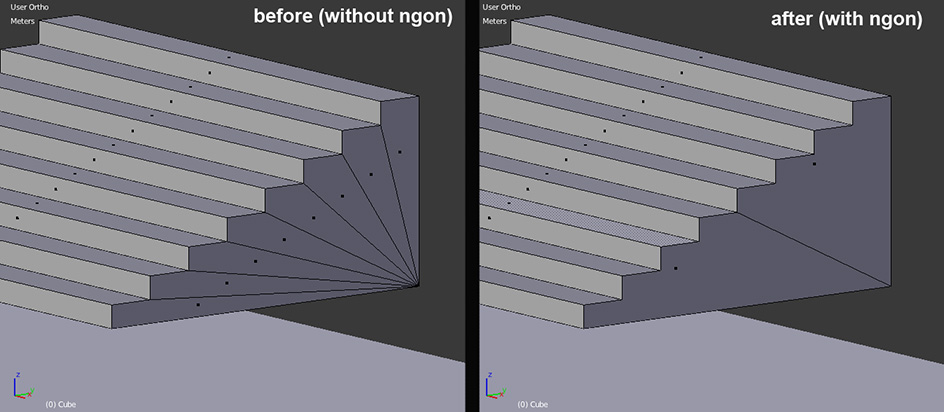
* You can work with ‘ngon’ for easy create-control model surface also it prevents creating useless small faces..
* You can work with real world size(metric) for your projects like AutoCAD,3dsMax..

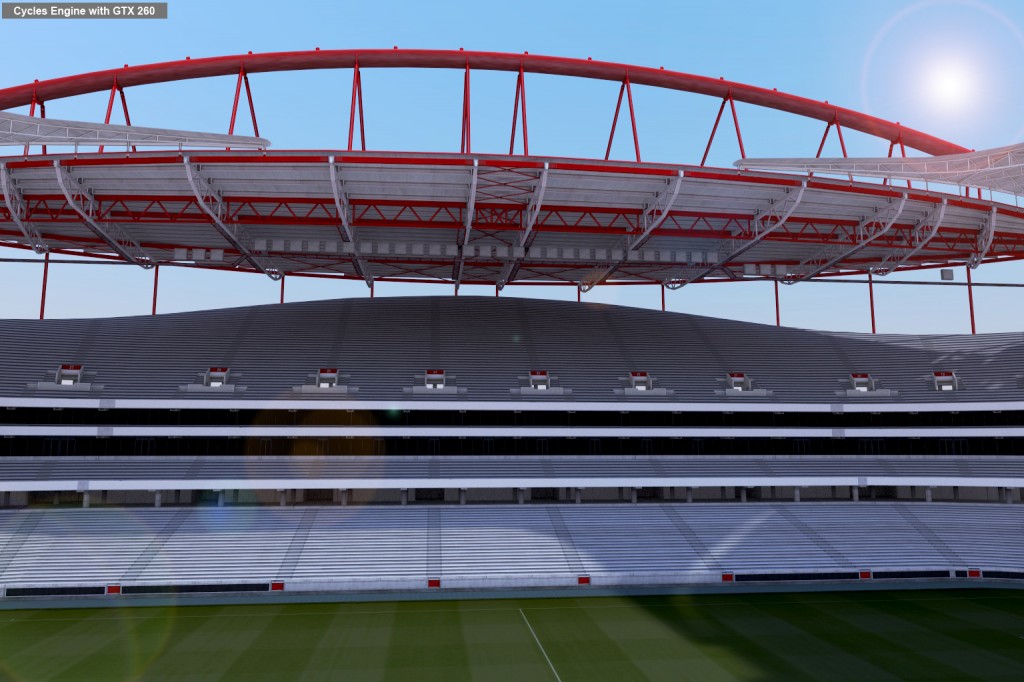
* You can get realistic render your projects with new Cycles render engine also it supports GPU CUDA calculation for fastest rendering process…(it needs different material setup and only for render your project, no ‘bake texture’ feature yet)

It’s here for download and testing:
Exporter Tool v1.5 :


Blender 2.67(32bit) : http://www.blender.org/dl/http://mir…-windows32.zip
Blender 2.67(64bit) : http://www.blender.org/dl/http://mir…-windows64.zip
Warnings/Suggestions:
1- Watch the 2 tutorials with carefully before anything to do…
2- This script is ‘beta’ version and it includes over 2500 code lines so far, of course there are some small bugs, need some little improvements, thats why i would not suggest that for newbie/beginner makers, ‘only professional advise,critics,bug report would welcome..’
3- Be careful when you assigning/loading textures, %90 script errors about the textures,(choose right format,exact file path,saving before process)(texture filepath/filename must be ‘English characters’ only, no special characters)
4- Just keep in mind, if u see black textures in game, try to decrease texture filesize less than 1MB…
5- You can see warning/info messages in Blender with using dos console, click ‘Toggle System Console’ in Blender ‘Help’ menu, you can following process/informations with using blender console…
6- Uncheck ‘Remap Relative’ option in the menu of left side when saving your *.blend file.
7- Make sure all image files saved before converting to DDS.
8- Make sure all image files converting to DDS and created under temp folder before Exporting process.
9- Default output folder is ‘C:\’ , if you dont select any output path, files will export to ‘C:\’ root directory.
10- Sometimes script may give a warning message when exporting, check out all model parts and textures before exporting, so if script says warning like ‘…… file using another application….’ dont worry and try export again, it will export it at second try…
11- I would suggest add staff elements lastly (guards,cameraman,boxes etc..) , thats will saving time for you because script is calculating each mesh triangle when exporting, so there are 75000 triangles for staff elements, if u add them firstly, script is trying 75000 x calculate when exporting at every time, that will waste time, thats why i would not suggest that…
12- I would suggest use TGA (Targa) format for alpha textures, it supports alpha channel and it ‘keeps all color information’, PNG uses layer transparency instead of alpha channel and ‘it removes color informations’..
13- You can use directly DDS textures with using NVIDIA DDS Plugin for Photoshop, but nevertheless click DDS convert before exporting, because DDS convert function is working like that:
– ‘if texture format is TGA or PNG; convert them to DDS (this process take a little time) and create textures under temp folder with ‘corresponding texture ID (0x27..)’
– ‘if texture format is DDS; read directly DDS data , no converting to DDS (that will save time for you) and create textures under temp folder with ‘corresponding texture ID (0x27..)’
(link: http://developer.nvidia.com/nvidia-t…dobe-photoshop)
Author :
Suat CAGDAS ‘sxsxsx’
Big Youtube Tutorials (2 parts):
YouTube – Let´s convert Blender to PES #001/002 (part1)
YouTube – Let´s convert Blender to PES #002/002 (part2)
My video channel for some small tutorials:
* Adding team banner, double-sided mesh objects, transparent mesh objects.
http://vimeo.com/user2100495/videos
* Light Effect tutorial:
YouTube – Light FX v13